
In Pokemon Sun, after completing Kiawe's Trial, there will be a twelth option on the bottom tab unceremoniously added. It does get mentioned on the next route, but it's a good idea to check in on it now.
As a side note, for some asinine reason, they put it on Page 2 and throw Festival Plaza and the Photo Club to Page 1 even if you rearrange your bottom screen menu to put the empty space on Page 1. This is presumably them setting a default, but seriously, why does the default have Pokemon Refresh on Page 2...

In USUM, you don't get it right after Kiawe, but you have to walk most of the way to the Route 7 barricade instead.


The justification for locking Poke Pelago to this point is that we have to Charizard Glide there, although it has been mentioned a few times before now and some features kinda feel odd to be dropped at this point.


Yup. This will be a feature related to catching a lot of Pokemon. You been wondering why even Noah and Ray have been working on that?


As a side note, Poke Pelago can be accessed anytime, not just in areas that are valid for Charizard Glide. If you are considered "indoors", you spin around in a sort of "warps somewhere" before triggering the Charizard Glide.


Poke Pelago is super bottom screen, but most of the explanations will be conducted on the top screen.
(Whether the proprietor is wearing red or green is based on SM/USUM).


Mohn is the NPC responsible for keeping it all running, and he'll largely be keeping his role in responsibilities off-screen. He dots all the 'i's and crosses the 't's.


We properly introduce ourselves, but he usually sticks to calling us "my girl" or "my boy". Still, seems only proper.


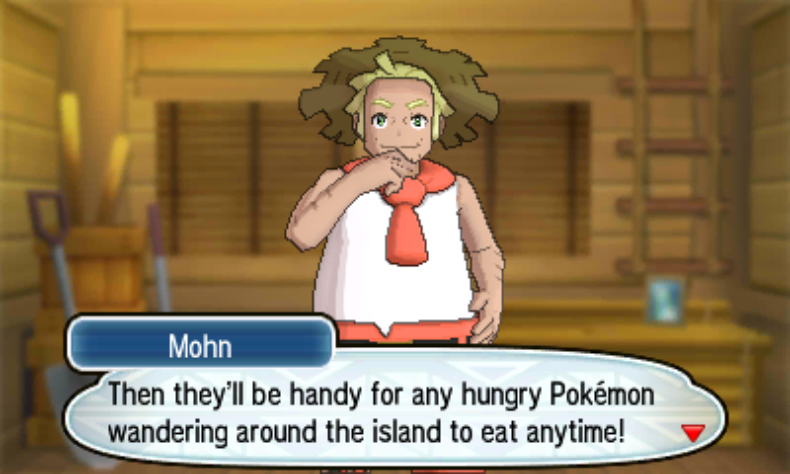
Worried about all those Pokemon I never use? Worry no longer! They're off to the Poke Pelago islands, and they'll even be able to lend us a hand in their own way.


There are five islands available, but only the first is open to start.


Poke Pelago is also the primary renewable source of Poke Beans, and even uses them as its own self-contained currency. All of the Poke Beans I've been getting from cafe visits have been saved for this.

This is what's on the bottom screen for now. This is Stage 1 Isle Abeens, the default island, and its purpose is to generate additional Poke Beans.


We'll only ever have the one Beanstalk, the rest of them are for feeding.


These are mostly found only here at Poke Pelago, but I'm told Patterned Beans are also rare finds at Festival Plaza.


I love how he says "I love hands-on learning" while doing a bunch of exposition. Someone needs to tell these writers this is not what hands-on learning entails.

Tapping on the beanstalk will cause Poke Beans to fall over the island. I'd show it, but...


Mohn has to gloat about teaching us hands-on before I get the chance to take the screenshot.


You get a small handful every now and then over a day, and I'm not sure how this is calculated, but on the scale Poke Pelago works, this is more or less all we need.

This is a mechanic that is useful to tutorialise, but I'm going to be ignoring on Abeens.


You can put Poke Beans in crates in order to improve the bonuses from particular islands. Abeens' bonus is terrible, but the other four value it more.


Sometimes, wild Pokemon will poke around Isle Abeens, and if you pay them attention and offer Poke Beans, they can decide to settle down. This is so RNG heavy that there's no real point in relying on it.


Putting a rare bean in a Bean Crate will increase the length of the effect. You can put a maximum of 50 Beans in a crate no matter what kind they are, so using rare beans will get you longer if you're hitting the limit.

I'll take your word on it and then ignore you.


There's one more order of business before we're truly left to our own devices: The Raft Hut, the place we go to talk to Mohn and have him do things directly.

It's like we've never left!


Why? Because they're there. At this point in his life, there's no real reason for him not to do this.


Take him at his word for this. There's a lot of stuff he'd need, and it'll be easier if we assume he has it.


He's got everything... except, you know, the Pokemon to fill it.


Considering how few mentions there've been of you so far, I have to wonder how new you are at this business. Oh well, everyone's gotta start somewhere.


There are five islands total, each with three stages of development.
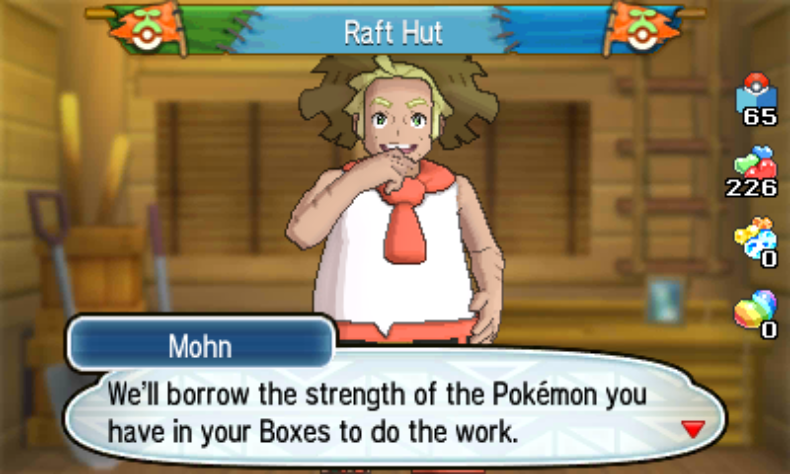

In order to develop an island, we need a set amount of Pokemon in our Boxes (not consumed) and a set amount of Plain Beans (consumed).

I have to assume the Plain Beans are the snacks used in the construction work- Mohn has the materials.

Developing Isles is the main reason to go to the Raft Hut. Once we've developed all the islands, there's not much Mohn can do for you anymore. Although he does ostensibly have some extra mechanics, they mainly make the development easier, rather than the game.

Now that the tutorial is over, Isle Abeens is now populated by a random sample of the Pokemon I've collected over the course of my adventure.

These will always be specific Pokemon in your boxes (as opposed to being filled with Pokemon registered as Caught), and while you can tap on them to see their Summary, they are otherwise just filler. They can do something directly, but this is relatively rare and more of a bonus than a real thing.
(Mohn makes comments about them on the top screen, mostly random observations.)

These are the three functions Mohn has. I will be ignoring Bean Bottles- those are, I believe, connectivity things I never got to work.


Time to make our start on developing this place.

Starting with the first island, Isle Abeens. As mentioned, Isle Abeens generates Poke Beans periodically, and also attracts wild Pokemon that may or may not join you tomorrow, based on the whims of the RNG. While it is absolutely your first priority to develop to level 3, we'll never think about it again.
- Stage 1: For free
- Stage 2: 15 Boxed Pokemon, 30 Plain Beans.
- Stage 3: 30 Boxed Pokemon, 90 Plain Beans.
Incidentally, which Pokemon you can get is based on your current plot progress. Nothing (except SM Murkrow) is not obtainable by other means at this exact point in the story. By default:
- SM: Magnemite, Gastly, Carbink, Spearow, Zubat, Shellder, Wingull, Pikipek, Kadabra, Murkrow, Drifblim, Rufflet/Vullaby
- USUM: Slowpoke, Staryu, Corsola, Zubat, Seel, Wingull, Pikipek, Cutiefly, Mr. Mime, Jynx, Flaaffy

Isle Aplenny is the place where Berries can be grown infinitely. And of all the means of acquiring Berries across the series, this is by far the easiest to make use of. We plant Berries in the soil, our Boxed Pokemon do the proper watering, and either 24, 48 or 72 hours later (based on specific Berry type), you get more Berries out than you planted. Plant a bunch of Leppa Berries, and Pokemon Centres get even less necessary for endurance runs. So, what arguments do we really have, I suppose...
- Stage 1: 15 Boxed Pokemon, 15 Plain Beans
- Stage 2: 30 Boxed Pokemon, 60 Plain Beans
- Stage 3: 45 Boxed Pokemon, 135 Plain Beans
In addition to heightened Berry yield, additional stages allow you to plant more Berries at a time- there are six plots per stage. Poke Beans placed in the crates halve the amount of time that Berries take to grow.

Isle Aphun is the big one here. We can send our Boxed Pokemon into the yonder (this will not deny us access to them), and they'll dig up an assortment of useful items for our journey. There's a few things in there, but the most important stuff on this list for SM are the evolutionary stones and selling items. We will quickly become very rich from leaving this running in the background.
- Stage 1: 30 Boxed Pokemon, 30 Plain Beans
- Stage 2: 45 Boxed Pokemon, 90 Plain Beans
- Stage 3: 60 Boxed Pokemon, 180 Plain Beans
Stage 1 only gets you a handful of not-great stuff, Stage 2 gets you the evolutionary stones, and Stage 3 gets you the selling items. You can also do "Interesting Item Hunting" starting from Stage 2, which allows you to draw from every pool you have access to at the same time. Poke Beans placed in the crate halve the amount of time Pokemon need to dig for treasure.

Isle Evelup is the Training Island, and... also the only one that doesn't start with the letter A, huh. You can set Pokemon to complete Training Regiments here, and depending on what you select them to train, you can get either EXP or EVs out of it. You get one bundle of each every half an hour, and you can order your Pokemon to do up to 99 of these half hour sessions at a time. This is how we can more reliably get EVs rather than stopping and only fighting certain types of wild Pokemon.
- Stage 1: 45 Boxed Pokemon, 45 Plain Beans. Gains 50 EXP or 1 EV a session.
- Stage 2: 60 Boxed Pokemon, 120 Plain Beans. Gains 150 EXP or 2 EVs a session.
- Stage 3: 75 Boxed Pokemon, 225 Plain Beans. Gains 300 EXP or 4 EVs a session.
Each stage gives a lot, which allows six Pokemon to train at a time. Each lot must be training in the same thing- so, if you want some mons to train Atk and some to train Sp. Atk, you must put them in separate lots. Poke Beans placed in crates halve the time it takes to complete a session.
Also, my resource doesn't mention it, but after using it a little more in time to come, I discovered USUM's stage 3 Evelup gives 500 EXP.

Isle Avue is the passive means of increasing Friendship and Hatch Time. Any Egg placed here will passively progress to hatching, while any hatched Pokemon will passively progress their Friendship stat. Pokemon that evolve by friendship that I'm not using will wind up in here, but as the last island to develop, it will be slower going. Note that, if a Pokemon spends 24 hours here, it overheats and starts losing friendship per tick- keep your eyes open.
- Stage 1: 60 Boxed Pokemon, 60 Plain Beans
- Stage 2: 75 Boxed Pokemon, 150 Plain Beans
- Stage 3: 90 Boxed Pokemon, 240 Plain Beans
In addition to having more space (six Pokemon per stage), the time taken to get more Friendship/Hatch Time decreases. You get +5 friendship or -1 Egg Cycle per tick, while ticks happen every four hours at stage 1, two hours stage 2 or one hour stage 3. Adding beans to the crate halves the time ticks take to happen.


Starting immediately with those Isle Abeens upgrades, using the Beans I've been stockpiling from the cafe. When you do this, you get like a bazillion Beans in one go, and I think each upgrade's Beans are remembered through the process. This will give us a nice healthy start on the rest of our islands.
Bethany has enough Pokemon to access Aphun 3, Evelup 2 and Avue 1. Ailey, thanks to all the USUM additions, got enough to push to the next stage up, Evelup 3 and Avue 2 (although she doesn't have the Plain Bean bonus to push ahead). Ray and Noah have been slacking off slightly, particularly with the Water Explore (what can I say, I don't like fishing), and thus they're both one stage behind. This is a bit of a problem, since Noah needs to use Isle Avue particularly badly, so at some point he goes back to fish up some new finds and reach 60 Boxed Pokemon.

This is the reason why we don't proceed past Stage 3. Most of the time, he's got enough of a point I can let it slide. And besides, I don't really need much better than 3...


Whee! 165 Plain Beans, 46 Patterned Beans, and 3 Rainbow Beans. That's pretty good on its face, but we can do better.


So then... we have these, but what do they... do, exactly?

Patterned Beans give +5 Affection per bean to your Pokemon, compared to +3 Affection per bean for Plain Beans. There are better uses for these, mostly by getting an hour of Bean time apiece by putting them in crates instead of 20 minutes.
Rainbow Beans should never be used for any purpose besides being fed to Pokemon.


Annoyingly, either because I've been taking a lot of shots in one go or I got a little too trigger happy (in my excitement to unlock and start working on Pelago, this comes at the end of the session starting with Route 6), I missed him gushing a little too much over Beans here...
They have delightful flavor and just the right amount of chew. Once I start eating them, I can't stop myself!


Presumably, he's been too busy eating Poke Beans to build up a stockpile to build with them.


Whatever he's eating, he's clearly not malnourished, we can't intervene any more securely than that.


Exchanging Patterned and Rainbow Beans for Plain Beans is necessary to get more Plain Beans for development, but they're better than Plain Beans for all other purposes. So... you know, only use it for Development.


While developing, I usually like having somewhere around 10 Patterned Beans left. I never trade in Rainbows.

OK! What do you think? This is Isle Avue! I've used the warm water that wells up beneath this island here to make a hot spring bath! Your Pokémon will be able to relax and get real cozy here.
Avue is my first stop, because friendship is necessary for some Pokemon in my team here...

In addition to Bethany's own Meowth and Munchlax (we've seen both evolve before, but those have been Noah's Munchlax and Ray's Meowth), we need to evolve Chansey and Igglybuff by friendship, and this will allow us to finish that up. I'll also need this to evolve two Eevees, but Noah and Ray have those duties.


Tapping on your Pokemon, in addition to resetting the timer until they overheat, will also give you a comment from Mohn based on how much friendship you already have. You need 220 Friendship to induce evolution, and one thing I kinda hate is that in-game friendship checkers almost never use 220 as a cutoff.
- 0-99 Friendship: Your Pokémon looks quite fond of Isle Avue.
- 100-199 Friendship: Your Pokémon seems pretty relaxed!
- 200-254 Friendship: Your Pokémon looks mighty relaxed!
- 255 Friendship: Your Pokémon seems so relaxed that it would be impossible to be any more relaxed!


OK! What do you think? This is Isle Aphun! There's a big cave on this island, so now your Pokémon can explore it and have adventures. That's right! If you want your Pokémon to explore one of the cave's paths, tap the sign and let me know! And if they find anything while they explore, I'll have them leave it in that treasure crate that's in the middle of the island.
I promise those are different stages of Isle Aphun. Bethany really wants those valuable items for that hat, but also for other purchases. I'm planning on actually buying all those TMs and some nice Poke Balls from the next shop in practical terms. Also, Stones are useful for our Pokedex.


We hit our Poke Bean limit this time, though. Perhaps if I traded more Patterned Beans, though, not sure why I'm keeping so many...

OK! What do you think? This is Isle Aplenny! I used that nice flat bit of land there to make a field where you can plant your Berries. Now your Pokémon can enjoy tending to Berry trees and harvesting Berries here!
Let the farming commence!

Starting with Tamato Berries for -Spd EVs for my tanks, Lum Berries for status cures, and of course, the Leppas. Can never forget the Leppas.


The paths to select: Respectively, Stage 1, Stage 2, Stage 3, and Random.


Digging for treasure always takes 24 hours.
Thankfully, writing the blog takes enough time that I'm getting plenty of rolls.

Bethany's first result from digging for Brilliant Stones came out with these. Prepare to get a bunch of generic Stones in the process.
- Stage 1 gives Shards in red, blue, yellow and green hues, Hard Stones, Revives and Star Pieces. Shards are only useful in the post-game, so that's why we're never using it.
- Stage 2 gives the evolutionary Stones, as well as the non-evolutionary Hard Stone, Everstone, Float Stone, Oval Stone and Light Clay. Light Clay is a nice item that increases the time Screens are set up from 5 turns to 8, we'll get some free samples later.
Evolutionary Stones are useful for the following families. Italics are for USUM exclusives, Underlines are for Island Scan exclusives.
- Fire Stone: Growlithe, Eevee
- Thunder Stone: Pikachu, Eevee, Eelektrik
- Water Stone: Poliwhirl, Shellder, Staryu, Eevee, Lombre
- Leaf Stone: Exeggcute, Weepinbell, Nuzleaf
- Ice Stone: Vulpix, Sandshrew
- Sun Stone: Cottonee, Petilil, Helioptile
- Moon Stone: Jigglypuff, Clefairy
- Shiny Stone: Floette, Minccino, Roselia, Togetic
- Dusk Stone: Misdreavus, Murkrow, Lampent, Doublade
- Dawn Stone: Snorunt, Kirlia
There are more Pokemon not listed, available only by backwards compatibility, but surprisingly not as many as it often feels. In addition to this, some of the Pokemon that I have gone out of my way to list don't need stones for collecting purposes, just for getting more of them. In addition to the fact we get (usually one of) these Stones for free, we don't need to do many digs to get all we need.

Ailey didn't need to develop Avue, so she got a Rare Item hunt the first time. And damn, she's one lucky queen. From Rare Item Hunting, we can get Hard Stones, Pearls, Big Pearls, Nuggets, Rare Bones, Pearl Strings, Big Nuggets, Comet Shards, Gold Bottle Caps, and in USUM only, all Fossils. Gold Bottle Caps are a postgame item, while Fossils come up... well, it depends on how far you want to grind. We can use these Fossils on the next route, but Bethany won't unlock the Fossil mechanic until a little further yet, so I'll save it for when she gets it. Mostly. But trust me, Ray and Ailey will be using it sooner...

Ah, this is why I conserved so many Patterned Beans. Since I spent so much time playing, I needed the extra Poke Beans in order to get my first session done at a favourable time tomorrow. Perhaps a little overkill, but you know...
Plain Beans last for 20 minutes, Patterned Beans 1 hour, and Rainbow Beans 2 hours. Patterned Beans are the best bang for your buck, and as such I usually only use Patterned Beans in crates. Note that, after placing Beans in a crate, you cannot put any new ones in, or take unused ones out, until the crate has been emptied.


"You guys can all share 12 beans, right?"


OK! What do you say? This is Isle Evelup! There are logs and things to climb, and a nice sandy area to play in and exercise with. Now your Pokémon can help themselves to grow stronger while they have fun! That's right! Check out the sign there and you can decide which Pokémon you want to invite to play here at Isle Evelup! I've also prepared some special drinks for the Pokémon playing here at Isle Evelup. Just a little treat from me for the hard workers! And you should choose a drink you'd like to share with your Pokémon when you're deciding who you want to call out to play.
Also picked up these. I'm doing EV training the same way I'm setting my IVs, Nature and Ability for the other three files, but Bethany will be making use of only the in-game mechanics for it. This has put her at a disadvantage thus far (my usual cheating mechanic isn't "give them all their EVs at once", but they've still had some EVs added by now), but since she's not capped by "playing fair", Bethany will pull ahead if left unchecked. Before I use them, though...


I need to head back to a PC and deposit the team, so they can benefit too. And while I'm leaving, putting Poke Pelago on the page in the menu on which it belongs: The first.


The "drink" they have determines what output they get from the sessions. You only get whatever you select, no need to worry about the other stuff going up too. Note: I will never be using Level Boost Drinks on my team- if they level up and learn a move, they learn it overwriting their first move slot. This is why we got rid of EXP gain in the Day Care, guys.


No need to futz around unlocking all seven drinks. We can make all our selections at all stages of development.


Everyone, raise your offensive stat!


First example of wild Pokemon. Some of the boys haven't caught all of them, so they might luck out there, but otherwise they just exist to help give freebie entries into the Boxes for those Box requirements. They appear on Isle Abeens proper to be touched, with the same thought bubbles that appear on the top.


With all the writeups to do and other files to run through, Bethany had plenty of time to grind up other islands, and hey, what's that Slowpoke got?

Sometimes your Boxed Pokemon just pick up a single Bean of any type. I think this is based on Aphun, but who knows, really.

Thank goodness I'm not screenshotting Ray's gameplay too much here- cameo appearances by the Pokemon I imported from the old games for the Photo Club showoff! I also see his Mew from time to time. Often at his farms, strangely.


The dialogue if a Pokemon decides to stay. You mean you've been chasing off the Pokemon that don't want to stay, they don't linger on their own?

Sometimes, if you scroll onto a screen when the timer is complete, you get that "Pretty Soon". This means that the timer is so close to 00:00 that it doesn't really make sense to show a clock. It'll be around no more than a minute before the session is done and you can reap the rewards, even if you don't click to another screen to reload it.
There's a few things I'll throw in here because they relate to the new mechanics we've been getting from Poke Pelago:


For starters, one of Bethany's Eevees will be the recipient of this Rainbow Poke Bean!


It's so happy!


The Rainbow Poke Bean applies a total of +125 Affection. Two Rainbow Beans and a few headpats is sufficient to get you to 5 Hearts of Affection, applying every bonus. Since I'm actively avoiding the Affection bonuses, I'll not be using these for the team, but it's really nice to feed these to Eevee or anything you want to get that x1.2 EXP bonus.


Sylveon (Ultra Moon): Sylveon wraps its ribbonlike feelers around its Trainer's arm because this touch enables it to read its Trainer's feelings.
To evolve Eevee into its Fairy-type form Sylveon, you must raise Eevee's Affection to 50 and level it up while it knows a Fairy-type move (typically Baby-Doll Eyes or Charm). Fitting, for the final Eeveelution introduced. Sylveon is a similar specially-defensive build to Vaporeon, but with its best stat being Sp. Def instead of HP. I think this is a worse situation for it, but the Fairy type works better for Sylveon in the main story. Vaporeon still has its strengths, especially if it's allowed to have Scald.
Sylveon's Ability is Cute Charm, giving it a 30% chance of inflicting infatuate on opponents. With its 7:1 gender ratio, this is usually aimed at females, but either way, it's still infatuate. Its HA, on the other hand, is Pixilate, the only Pokemon to get it in a normal state. Pixilate will turn any Normal-type moves it knows into the Fairy type, applying an extra 20% damage bonus as well as STAB. This power is very cool, although whether it is useful is a matter of opinion and "can you actually get the right moves?" Yeah, a bit of an awkward sell, but one that can make a good impression if you have the empty hole in your team that Sylveon can fill.

With conventional friendship techniques (and annoyingly, this is overwritten by Sylveon), Eevee will evolve into Espeon in the daytime. We've seen Espeon in action before, and the comment remains more or less the same- it's basically "Abra but available on a reasonable basis."
Its Ability is Synchronise, allowing it to inflict any non-volatile status it suffers directly onto its opponent (unless it is not allowed). Decent, but its real nice Ability is its HA, Magic Bounce. Magic Bounce reflects most hostile Status moves back to sender- so, if someone tries Thunder Wave or Stealth Rock on you, you both block it and use it on their side on the field. Espeon is both a powerful sweeper and a passively killer utility mon. Such a great choice.

Umbreon (Ultra Moon): It lurks in the dark of night looking for prey. At the moment it pounces, the rings on its body glow dimly but ominously.
If an Eevee with the required friendship levels up during the nighttime, it instead evolves into Umbreon. Umbreon stands as the anti-Espeon in many ways, investing its good stats into Sp. Def, Def and HP, in descending order. If you're using an Umbreon, you're here for the ability to stop the opponent cold. It gets a handful of neat moves for this purpose, some of them shared with the other forms like Baby-Doll Eyes and others being unique to Umbreon like Moonlight, and it does its job admirably. Its problem is that pure bulk is not all that desirable in the main story. A few of the necessary pieces require postgame exploration to acquire, and also playing bulky takes far too long to justify the time spent going for it.
Umbreon's Ability matches Espeon's with Synchronise, inflicting any statuses inflicted on it right back. While Espeon's scared of paralysis slowing it down, Umbreon is scared of poison to deal secure, fixed damage- and fittingly, poison is how it deals with its opponents anyway! Its HA is Inner Focus- a bit of a dud, as all it does is block flinches and Umbreon isn't too dependent on not flinching to get the job done, but it's at least something with use cases.


Blissey (Sun): Even the most ferocious Pokémon become calm when they eat Blissey's egg, which is said to be filled with happiness.
And can't forget we can now get these friendship evos. Blissey this early can be terrifying, and even USUM can get it now thanks to Oval Stones from Pelago.
...Well... OK. I can't really beat around the bush any more, particularly given something that happens on the next route in USUM. I'll have to cover it eventually, and I guess that time is now.

Welcome... to Festival Plaza.


This guy is one of Ula'ula's Trial Captains, and he moonlights as the manager of this hub for inter-trainer connectivity.
He is at least canonically unskilled with social skills, so his inability to realise that his tutorial is the worst thing in this entire game presumably escapes him, but still. Whoever designed this place has earned a hearty slap in the face.


As one might expect, the fact that 3DS communication over the internet is no longer possible renders this place pretty worthless to us and to everybody.
But you know... really gotta teach us how to use it.

You should've thought that one through a little sooner, perhaps.


Hahaha, no. I stumbled in here by accident (no, seriously, I fell face-first in here by accident during the Water Explore), and I would very much like to leave.

You get given a But Thou Must question here. The least we could be offered was the opportunity to be kicked out if we had no plans on using internet connectivity.


See, while Mohn kept us a bit longer than we might've liked, he justified himself by actually providing a valuable service.

And, of course, Poke Pelago is rather neatly contained, all told. Festival Plaza...


Festival Plaza has us, Bethany, running around. And this feels very much like a situation to nope out of until we might actually care about linking up, right?

Hahahaha they take away the entire bottom screen. Pelago does this too, but it gives you so much less access to the bottom screen to begin with it doesn't feel so bad.


There's a little voice bark from passersby, and then you do the Alola wave to greet them. This part seems to be the main reason they teach it to you so formally for something they almost never bother with in the main story.


You are misinformed, but so is the real host.

Usually, ignore them. I need to Trade, I'm doing it with the person I asked, that's the only way I know I'm getting it back.


I don't really understand this mechanic, but, well, we have another currency that is useful only within a certain facility, to buy things we can buy with no other method. Just on top of the things Pokemon usually handles badly.

I never bothered with this, but I haven't heard great things from people who have.

And we have to walk back to Sophocles. To reinforce the whole "I misclicked and wound up here by accident, please let me out" feel.


Don't worry, I am going to promptly forget the name "Festival Coin". Why aren't they FP, anyway, like the other non-Poke currencies?


He mentions each, as if we are planning to use them, and then doesn't bother to explain them in any detail- or even all of them.


You start with at least four types of Facility for Sophocles to mention in a single sentence, and then he goes on to say "oh, we have others". There are seven in all.
- The lottery shop is a source of a free daily random item, as determined by lottery prize. These can be Berry Juices, Full Heals, Ultra Balls, Max Ethers, Max Elixirs, Max Revives, PP Ups, PP Maxes, and the final two rewards are based on the name of the lottery shop:
- Big Dreams offers Rare Candies and Master Balls.
- Gold Rush offers Nuggets and Big Nuggets.
- Treasure Hunt offers Bottle Caps and Gold Bottle Caps.
- The bouncy house is a place to train EVs, and only one course may be completed in a day. The amount of EVs you may receive from it is based on its rank, with the initial ranks awarding +4, +8, +16 and so on, at increasing FC costs. You do not receive the ability to get more than 64 EVs in one go until postgame.
- Thump-Bump Park offers Attack and Special Attack. Higher levels found in Moon only.
- Clink-Clunk Land offers Defence and Special Defence. Higher levels found in Sun only.
- Stomp-Stomp House offers HP and Speed. Higher levels found intermittently, with the highest level found in Moon only.
- The haunted house is a place where Pokemon can be sent through a house once a day for 10 FC each. They will pick up one or more items as they proceed, and while this can offer the nice items PP Up, Max Revive, and Sacred Ash, it's really more trouble than it's worth to go through each one. They are split into Ghosts' Den, Trick Room and Confuse Ray. I'm leaving it there.
- The food stall is a place where one can buy meals for Pokemon daily. Each meal can be fed to a single Pokemon, and will give them a bonus to something, as determined by the meal.
- Rare Kitchens sell level-increasing meals, with higher ranks allowing Pokemon of higher level to eat at them. Only in postgame can more than one level at a time be purchased. The highest levels are found in Sun only.
- Battle Tables allow the purchase of EV-increasing meals, +10 EVs for 20 FC. Bouncy houses are a better deal, but these offer more meals to more versions. They offer level-ups in postgame.
- Friendship Cafes and Parlours allow for the purchase of friendship-increasing meals, as well as meals that decrease EVs. You get them in batches of -100, and which EVs you can reduce differs based on rank. Cafes are found in Moon and give Sp. Atk, Sp. Def and Spd sooner, Parlours are found in Sun and give HP, Atk and Def sooner. Postgame, each facility can offer EV reductions to 0, but these are version exclusive to the stats listed.
- The goody shop allows for the purchase of batches of items, sold on a random basis each day.
- The Ball Shop sells various types of Poke Ball in batches of 12. Specialised Poke Balls are only available postgame, and higher ranks to make them (and Ultra Balls) available are only in Moon.
- The General Store sells miscellaneous goodies, including the vending machine drops and the regional items. Some of them are randomly locked behind Moon (only thing of value being PP Up), while there's one item locked to postgame- the Big Pearl.
- Battle Stores sell Battle Items. Most of the X Items other than Atk, Def and Spd are locked behind Moon.
- The Pharmacy sells healing items, followed by Revives and Vitamins at higher ranks available only in Sun.
- Soft Drink Parlours sell only Moomoo Milks and the vending machine drinks.
- The fortune-teller tent will read your fortune for 10 FC, and will subsequently tell you what part of the Plaza is "lucky" today. You can get good luck at a lottery, haunted house, bonus FC for walking around the Plaza doing requests, or more FC from doing GTS and Wonder Trade. The Version exclusives here are based on region, not that I know if the regions have any difference. (Johto, Sinnoh and Kalos are Sun, Kanto, Hoenn and Unova are Moon.)
- The dye house allows you to dye white clothing items a colour of your choosing, with store-bought dyes available, or you may trade a number of Berries to receive similar results on your own. Pre-made dye seems to be version-exclusive based on the actual version-exclusivity of each, but also Yellow and Green look switched, because... I dunno.
WHO MADE THEM VERSION EXCLUSIVE? OK, now I'm actually throwing hands... (You can get version exclusives by linking with the other version, but also both acquiring Facilities yourself and stealing them from others is so ridiculously convoluted that I'm not sure I'm counting that in its favour).


Now that I was busy doing Sophocles' job better than him, we've got to go through the process of talking to people for FC again.


This time, we have to satisfy them to get the FC. Fortunately, their requests are super easy.

You just need to answer tutorial questions.

No, seriously, this time they kick you out if you don't already know it.


Rolls eyes.


And by "whispering", they mean "yelling rather loudly for attention".

Nobody tell anybody, but if you want to actually form those connections, you may need more than the in-game chat options available to you.


I highlight this, because...


We even have to sit through one of these.


The worst part is, I would very much like Bethany, Ailey, Noah and Ray to be able to communicate with each other, but this is an incredibly convoluted process I can't do by default.
Amazingly, I have found a way to do it after the fact, and we'll get a few cameos later on. But even with this ability to communicate, all they really get out of it is the option to do some tradebacks for trade evos and version exclusives.

If there's any point where you really feel the developer's desire to handhold the children with short attention spans the mobile market taps into, it's places like this that spell things out so blatantly. And they fail to realise this is what is scaring those very children away.


The Rank goes up to 999, by the way. Also, to get the "postgame" prizes, you must be at least Rank 30.
(100 is the point they stop giving unique prizes.)


The main thing you get from each individual rank is a reward from Sophocles.


He will make you an offer for a randomly selected Facility. If you decline the Facility offered, he gives you a selling item, with the value of the item being based on the star rank of the facility offered. You cannot stockpile attempts at getting the facilities you want.
You can still get one star facilities at high ranks. At Rank 3, you get chances of 3 stars. At Rank 11, you get chances of 5 stars. The odds of Facility Stars at Rank 100+ are 10%/15%/40%/15%/10%.
And here I was hoping explaining this would make me warm up to a mechanic I never liked.


It's really hard to sell the idea that you're offering "cool rewards" if the first thing you give is what is guaranteed to be a one-star repeat shop. Yes, even though there are differences between types of Facility, that's something people can only understand if they look into the weeds- and even then, many one star facilities don't have differences yet.


Thank Arceus he means it... in SM.

That'll be a first.


Noooo. You serious?


We'll see if your Trial can't make you come off any better.

Things you never realised could be so rewarding they actually trigger the dopamine: Finally getting access to the button required to leave.

If I would, I could, but also Bethany is currently too busy at this point in the story.


If that could've worked earlier, I would've.


Anyway, as mentioned, USUM gets dragged inside, to go over these facilities. There is a reason for this. If given infinite patience, I may be eventually convinced it was a good reason.
...
No, no it's not.


The stuff in here is for getting various internal things done.


If I wanted to know, I would have spoken to you.


So, it's a paperweight now. Game Sync allowed you to connect to the Pokemon Global Link, which shut down in 2020 and I'm not entirely sure what function it even had for the SM games. Battle Videos allow you to save matches done in the post-game battle facility or done online- sharing them online ended with the Nintendo Network in 2024.


These were ran periodically following the release of the game, and were one-time things that awarded FC for successful completion. One thing that Game Sync did do was double the FC awards here, as will as giving extra items (Rare Candies and Apricorn Balls) for individual participation in the third SM mission onward. The latter was only in SM, though.
There were nine global missions offered for SM, the last of which was ran from July 25 to August 7 in 2017. Eight were ran for USUM, the last of which ran June 5 to June 19 in 2018. The first two in SM and the first in USUM were failures, but the other fourteen were successes.
(Can I take a moment to point out that the first Global Mission for USUM began a day before the game launched? Really, can we be blamed for failing that one?)


I'm... not sure that's going to be an issue in most cases? Maybe if you've got so many visitors you can't find the person you specifically want, but also that's such a "suffering from success" thing.

An essential worker if Facilities were worth the ground they are built on.


Ailey got an automatic kickout because of the circumstances of her arrival. Everyone else wishes they were so lucky.

Here is the bottom screen. The green Poke Ball and orange Bag are the Party and Bag options normally available, while the other buttons are unique to the Plaza.

The yellow list button allows us to set up Guests, who are people we've met via communications, VIPs, which allow you to have a permanent listing of anybody you care about talking to on a regular basis (you can have up to 50 of each), and a Block List, for players who you don't want hanging around (100 cap).


The purple person figure allows you to configure a profile, including the messages you send to other players when your character appears in their game. These are neat for charm, but that's a long-looking scroll bar...

I think we all know what button I wanted to push, though. Back to fishing things up in Melemele Sea!

Another thing I should probably mention, while I'm feeling upset, is this bit in USUM. Once Rotom's "got along with you" (something that happened to both Ray and Ailey back around Lana), it will start giving you advice you didn't ask for. It will almost always be advice that isn't useful, and you will not be able to use that all-important bottom screen until it's done. Because they looked at one of the features that wasn't taken well in SM and made it worse for seemingly no reason. At least some issues have a reason for existing.
Next time, in the present day: The other side of Route 5.
No comments:
Post a Comment